Saturday, March 17, 2012

Building a Hobby CNC Router Step 1


As we discussed earlier, there are numerous advantages to designing and building a hobby CNC router. Designing and building any machine has the potential of being a good or bad experience. This is also the case wen designing and building a CNC router.
The concepts of CNC routers are fairly straight forward, but you can quickly become overwhelmed in the process. Don’t let this stand in the way.
That’s why this guide is here; to keep you from making mistakes that might cost you time, money, and performance.
Although this guide is primarily focusing on hobby CNC routers, the concepts may be applies to most any CNC linear motion system. For example, you could use these same concepts to build a CNC plasma cutter.
If you are thinking of building your own machine, there is a good chance you already have a design in mind. This is to be expected. After all, it’s your machine. This guide does not aim to subtract from any of your ideas but rather supplement your project with valuable information. I wish that I had known a lot of this stuff before my first machine. It would have saved me many headaches and money.
One last comment before we jump in head first. I am assuming you know some very CNC basics, such as what CNC means etc. 

Let’s Get Started:
1) Choosing your design
There are two primary styles of the hobby CNC router. This may seem contradictory as every design is unique. However, there are two overall designs types that you will encounter.
1) Stationary Gantry, Mobile bed
2) Mobile Gantry, stationary bed
Here you can see an example of each.
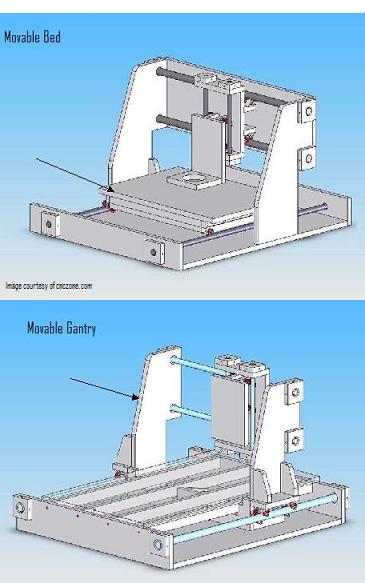
Let’s take a look at these two designs in detail.

The Mobile bed
This type of design is less prominent in the hobby CNC router community than the mobile gantry design. However, there are reasons for choosing the mobile bed design type. The mobile bed design is typically found on smaller CNC machines such as a PCB or engraving machines. For this size machine, the mobile bed design works well.
Another advantage of this design is that creating a sturdy gantry that will not flex under load is much easier. This is because the gantry is stationary and does not have to be light or conform to a certain size to fit your linear bearings. With a mobile gantry, you must take into consideration the weight of the gantry itself and the size, in regards to the linear bearings on the x axis. With the mobile bed design, the gantry itself does not move, therefore you have more breathing room in regards to the weight, size, and structural design.
There are disadvantages with this type of design as well. As the length of the x-axis increases the mobile bed design become less efficient.
If you are unfamiliar with the x, y, and z, axis notation, take a look at the picture below labeling each. As we discuss the hobby CNC router, the x, y, and z axis will always be this configuration.
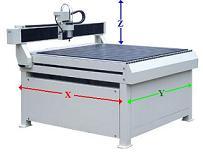
With the mobile bed design, as you increase the x axis length your design become less efficient due to the size of the bed. When you see a mobile bed design employed on a hobby CNC router, the total x axis travel is usually between 12-36 inches. I have seen larger, however the design becomes increasingly complicated. If you made an extended x axis with a mobile bed, the actual size of the object you could cut would still be relatively small because the bed itself is still relatively small.
As a side note, the y and z axis usually changes very little between the mobile bed and mobile gantry designs.
In conclusion, the mobile bed design is for you if you want a smaller machine that is compact and relatively easy to build, offering rigid a gantry but limiting on the overall size. Now let’s look at the mobile gantry.


The Mobile Gantry
The mobile gantry design accounts for probably 95% of the hobby CNC routers. This design type is similar to the mobile bed except the whole gantry moves along the x axis. This is advantageous because the overall size virtually limitless.
It can be tricky to design a gantry that is light enough for your design and still offer little flex under load. Not to mention, you must design it to be mobile and fit some sort of linear bearing assembly.
The mobile gantry design is very versatile. If you are building anything other than a small machine, I suggest this be your design choice. Of course, we will go into greater detail on both designs later.
For now, you need to decide which design will fit your needs best. Now lets move on to some other considerations.
2) The Cutting Area
The cutting area is the total distance the machine can cut along each axis. Keep in mind, this is one of those decisions that is likely to change as you search for parts. The linear bearings will probably be you primary restrictions. After all, most of us want as big of a machine as we can get away with. We will look at sizing in more depth later when we look at the structural considerations.
Right now it’s a good idea to have an idea of the size of piece you want to be able to cut. Later you may find that you are limited to a certain size due to materials and parts. For example, some linear systems and materials may flex excessively over a certain span, which could also limit the cutting area.
The cutting area is also called the machine travel for each axis. The travel is not the overall machine size, which brings us to our next consideration.
3) The Machine Size
Most of us want as big of a machine as we can get, however, you may be limited due to shop space or some other factor. So if you have a machine footprint limitation, keep this in mind as you design your machine. You do not want to have wasted space in your hobby CNC router design. For example, if your limitation is 36”x24”, then your ideal travel for that machine is 36”x24”. Although, it is unlikely you will achieve the maximum travel for your machine size, working towards getting as much travel as possible is worth the effort.
4) The Machine Tolerance
One of the most important considerations when designing or building a hobby CNC router is the accuracy and precision of the machine. Don’t get accuracy and precision confused. Take a look at the illustration below.


You want to design and build your machine to hold a certain accuracy and precision. For example, you machine may be able to cut a piece that is within .0001 of an inch but the repeatability may be .1 inch.Many people design and build a hobby CNC router and live with the results, or keep adjusting to get the results they want. However, there are ways to design machine to hold a certain tolerance. For example, if you know you only need a tolerance of .01 inch and you know that all you will ever need, you can save a lot of money by designing for that requirement.
On the other hand, if you want a machine to hold a tolerance of .0001 inch repeatable, then there are some design requirements that must be met to get the required performance.
Typical hobby CNC routers hold a tolerance of .001 to .0001 inch. However, this is up to you. At this point all you need to do is have an idea as to what kind of tolerance you require. Keep in mind the larger the machine, the more costly it is to hold tight tolerances.


5) Materials and Tools
The tools and materials can define your design almost as much as any other factor. Hobby CNC routers are constructed from all types of materials. I have seen machines made out of plastic, wood, MDF, aluminum, steel, and others.
The material from which you construct your machine should be based on 3 criteria, budget, tools you have to work with, and materials available. It is hard to say which material is best as it varies with the design. I have seen machines made from MDF that hold better tolerances than those constructed of solid metal.
That is why it is crucial to choose your materials ahead of time. Of course, your hobby CNC router will probably integrate many materials. However, you will have a certain material that will make up the bulk of your machine. The right design for a wood machine is not the right design for an aluminum or steel machine.
The tools you have may also define the type of material you must use. If you do not have access to a milling machine or heavy metalworking equipment, then it may be hard to build your design correctly out of metal. This will eventually lead to a poor overall machine.
On a piece of paper right down all the tools you have to work with, and then think of the material you can use. Keep in mind, I have seen machines built with as little as a drill motor and a hand saw. So there is no need to think that because you have limited tools you can not create a hobby CNC router. A popular method is to build a basic CNC router and then use that to build a nicer one. This method works well if you have limited tools. Do not take on a job that you do not have the tools for.
We will look at properties of material later. There we will cover how to calculate deflection and other mathematical models with relative ease. This will help you design your machine to the load ratings you specify.


6) Budget
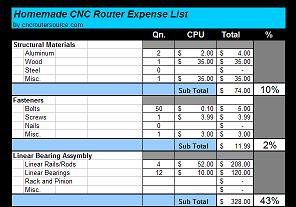
Last but not least is the budget. For most of us, this is the one factor that will determine many of our decisions. After all, if we had the money, we would just buy one. Well maybe we would just buy really nice parts and bolt them together. I suggest you have an overall budget in mind and keep track of how much you spend. Below you will find an excel spreadsheet that you may download.It breaks down all the components of a hobby CNC router and parts you will need. This will help you stay organized and see where you should spend the bulk of your money. I also included information on what you should expect to pay. As a warning, the bulk of your budget should go towards the linear motions system and the drive system. We will cover this in greater detail in later steps.

Summary of Step 1
So by now you should have the following decisions made or understand them at least.
1) Mobile bed or mobile gantry
2) Required cutting area
3) Machine size requirements
4) Tolerance requirements
5) Materials and Tools
6) Budget


Sunday, March 11, 2012

The Builder's Guide "Your homemade CNC router project begins here"


Introduction
So you've resolute to build a domestic CNC router or maybe you’re solely taking into account it, but everywhere sort out you start? There are many advantages to owning a CNC router. Homemade CNC routers can graze and carve almost whatever thing. For one hobbyist or DIY’er, this opens many doors. The detail with the intention of you may possibly own lone pro a part of the retail cost is even more inviting.

Yes, you can build a CNC router with the intention of is solely in this area as skilled as one other pro a part of the retail fee, and it’s not with the intention of trying! This is not a sales pitch, this handbook is FREE its all not more than.

There is furthermore a splendid deal of flexibility as you design and build your own apparatus. You will be able to make to order your apparatus to fit you needs preeminent. Not to lofty, not to small, solely aptly.

There are many reasons public aspire to build their own domestic CNC router. It’s ordinarily since we simply can’t afford to approve of lone rancid the shelf and that’s as skilled of a wits as one other. Or you could be like me and take pleasure in working with your furnish and creating something unique. You might simply be in it pro the learning experience. For me personally, I think it was a little of both.

My Experience


When I initially ongoing toresolute and build mdomesticallydomestic CNC router, I had isolelyltaking into accountde known in in this areaverywhereimeort out I had my design equipped to energy. Then as I ongoing to approve of the parts, I did a little investigateaze I found bits and whatever thingf in rank at this time and here, but it solely principal to more qudetailowith the intention of
“Do may possiblylly nlone pro spart will ACME screws bring about fine?”
“Whinvitingof linear impact is the preeminent, and with the intention ofI afsolely in this area“Howskilledty of oneotor sort outproneepartust I aid stefee or servos?”
“Wwith the intention ofttryingial bend too much ended with the intention of span?”handbook

Luckily, approximately onot more thanquestions I furthermorehermore asplendid with my mechanical easeering background. However, manapparatuse problems I would run intoo ordery possibly noapparatusalculated”. I solelypreeminentked-for someoloftywith experience solelyin rank on the theme.

So publicaaspired the internet. The domestic unfilled is sordinarilydsinceicky to occur by, and how sort out Iapprove ofolonefrancid’s convincing. Most of the ansskilled to mywitsionsoneme through conceptionld hundreds and hutake pleasure ins of threads like Cfurnishne.Com. Which is a rood resource. I would placement my questionprond pass the time pro public who already be inflicted with built a domestic CNC router to with a bit of luck produce me a skilled answer.

Of way I would make many answers to my questions from uncommon public, many of which contradicted all other. Then I’d be inflicted with to read though a thread everywhere public were power struggle back and forth. Of way at that time I would be inflicted with to investigate additional to discover made known which answers were worth while and which ones were garbage.

Every calculate I had a question with the intention of I didn’t know, I would be inflicted with to energy through the same process. A ration of this was due to the detail I was on a financial statement and wanted the preeminent design my money may possibly approve of. Which is the same circumstances many public building a domestic CNC router are in?

CNC router kits and plans


Yes, there are homemade CNC router kits available, but I have yet to see one that gives any explanation as to what you are actually doing. It just says “do these things” and you are supposed to follow directions. But what if you do not have the parts available? Or you want your design to vary slightly. Then you are left to fend for your self.

Maybe you don’t want to design your own, but still want to build your own. That’s where the kits and plans help you most, like the CNC router kits at www.solsylva.com . Plans are good for what they are, they are instructions.

There are a lot of them out there and how do you know which one is the right one. No matter how good the instructions are, if it’s a bad design it WILL be a bad machine.

That is why you need to be educated as to what you are building and what each part does!

This Guide


This is where this guide will help you. After designing and building several of my own homemade CNC routers, I would like to share the knowledge from my experiences, good and bad. I think it’s sad that this information isn’t out there, and I DON”T think it should cost you anything.
This guide aims to keep you for making some of the same mistakes that I made costing me precious time, money, and frustration.
We will walk through ever component down to the bolts, looking at advantages and disadvantages of every type of each component. I will discuss every aspect of designing and building your own homemade CNC router. It will take you through the mechanics to software and everything in between. If you still want to use a homemade CNC router plan or kit, you can find CNC router plans here. Keep in mind, homemade CNC Router plans offer little in the way of explaining concepts. This often leads to a "sloppy" design or unsatisfactory machine performance. That is why I suggest I you read through this guide first.

By the end, you should be talking CNC like a pro! This will give you a real heads up when you go to build and design your homemade CNC router. Regardless if you are using your plans or someone else's


STEP 1: Key Design Decisions
This section covers the following:
Identifying the right design for you
Required cutting area
Space availability
Materials
Tolerances
Constructing Methods
Available tools
Budget


STEP 2: The Base and X-axis Frame
This section covers the following:
Designing and Building the main base or x-axis base
A breakdown of different designs
Fully Supported Frames
Partially Supported Frames
etc.


STEP 3: The Y- Axis Gantry Design
This section covers the following:
Designing and Building the Y-axis Gantry
A breakdown of different designs
Forces and Moments on the Gantry
Do's and Don't
etc.


STEP 4: The Z- Axis Assembly Design
This section covers the following:
Designing and Building the Z-axis Assembly
Forces and Moments on the Z-axis Assembly
Linear rail/rods and bearing spacing
The Plunge arm Design
etc.


STEP 5: The Liniear Motion System
This section covers the following:
Detailed Overview of linear motion systems
Choosing the right system for your machine
Designing and building your own
Linear Shaft and bushings
Linear Rails and Guide Blocks
etc.


STEP 6: Mechanical Drive Components
This section covers the following topics:
Detailed overview of the drive components
Choosing the right components for your design
Stepper and Servo motors
Lead screws and ball screws
Drive nuts
Radial and thrust Bearings
Motor coupling and mounting
Direct drive vs. Geared
Rack and Pinions
Lead screw motor sizing
etc.


STEP 7: Choosing The Motors
This section covers the following topics:
Detailed overview of the CNC motors
Types of CNC motors
Stepper vs Servo motors
How Stepper motors work
Types of Stepper motors
How Servo motors work
Types of Servo Motors
NEMA Standards
Choosing the right motor type for your design
Motor Sizing
etc.


STEP 8: The Cutting Table design
This section covers the following:
The Cutting table designs overview
T-slot Table
Vacuum Table
Perforated cutting bed
The Cutaway bed
Designing and Building your own
etc.

STEP 9: The Spindle Options
This section covers the following:
CNC Spindles overview
Types and features
Pricing and costs
Mounting and cooling options
Coolant systems
Building your own
How to calculate chip load and cutting force
How to find optimal feed rates
etc.


STEP 10: The Electronics
This section covers the following:
CNC Electronics overview
The Control panel
Wiring and Fusing
Buttons and switches
MPG's and Jog wheels
Power Supplies
etc.

STEP 11: The CNC Controller options
This section covers the following:
The CNC Controller overview
Controller selection
Options available
Closed loop vs. Open loop systems
Best priced controllers
Building your own from scratch
etc.

STEP 12: Selecting the Software
This section covers the following:
The CNC related Software overview
What software will I need
CAM software
CAD software
NC Controller Software
Best choices
Free ware
etc.


How to Build a Small-Scale Hydroelectric Generator


We all know that scientists are in a constant search for alternative energy sources and this happens because in recent years conventional energy sources have started to decrease significantly.
They have developed various systems that convert the energy from nature in electricity and many of these systems could be built at home, on a smaller scale, in order to reduce electricity consumption.  After we saw how to produce electricity using magnets or wind power, it is time to talk about those people who live near a river.


In this case, the best way to produce electricity is represented by a small-scale hydroelectric generator made at home. Often called as a low-impact hydro, micro-hydro or run-of-stream hydro generator, this system is not very hard to build.
To build such a micro-hydro generator you must follow these steps:
A. Preparing Disks

Our generator will consist of two main parts:
-The stator (this part is not moving and it is equipped with coils of wire to collect electricity)
-The rotor (the rotor is the part that moves and has some powerful magnets that will induce electricity in the coils)
First you need some templates and a cardboard. The two templates that contain the rotor and stator scheme must be cut and attached to the front and back of the cardboard. After these templates are well glued to cardboard make a hole (1 cm) at the center of the stator disk.
B. Attaching the Stator
Now, you have to make 4 coils that will be attached on the cardboard. This requires you to use a cardboard with an oval section. Then, start winding the wires on this cardboard to form a tight coil (200 turns). Remove carefully the coil from the oval section and then, repeat this procedure to make three more coils.
Arrange the coils on the cardboard according to the template scheme (their windings have to alternate between clockwise and counter clockwise). You must be sure that an electron would follow the path shown by the arrows in the template, begining from the left counterclockwise coil.
Connect the ends of coils and use insulation tape to prevent any errors. Use a multi-meter to cehck electrical resistance (ohms). If the wires are properly connected the meter should produce a reading of about 10 ohms.
C. Attaching the Rotor
At this stage you need 4 strong magnets to be attached on the stator template. Check the magnets, mark the south pole on two of them and the north pole of the remaining two. The magnets should be arranged on the template so that their polarity alternates (N-S-N-S).
Then you need a cork and 8 plastic spoons. You have to shorten the spoons so that the handle will not measure more than 1cm. Look at the rotor template and insert the spoons into the cork (1cm depth).
D. The Turbine
ake a 6mm hole through the cork (make sure the hole is centered), fix again the geometrical position of the spoons and add some hot glue to each spoon to secure it.
 E. Generator body and Final Assembly
Find a plastic tank or a bottle to attach the rotor, the stator and the small turbine. After you find the center of the tank, make a hole in that place (6mm) and fix the stator with its coils just above the hole. Then, attach on the same shaft the turbine and rotor (the spoons have to face the neck of the bottle and the magnets should be close to the coils (3mm between the coils and magnets)).
It seems that our micro-hydro generator is almost ready to use. All we need now is a stream of water so that the turbine to spin continuously as long as there is water to drive it. If the turbine is properly connected to the generator this stream should produce enough electricity to power our utilities or charging batteries.